
For the fifth and final portion of my Git Integration with VS Code blog series, this post focuses on Synchronizing Content with GitHub. Previously in Part 4, we configured Visual Studio Code to establish a connection and download content from GitHub. In this post, I wanted to focus on staging, committing, and pushing content back up to GitHub.
Sync a New Sample Document
- If it’s not already open, go ahead and launch Visual Studio Code.
- In the left pane should be the Explorer view. If the Explorer isn’t open, simply go to View > Explore (or use the keyboard shortcut CTRL + SHIFT + E) to open it.
- In this example, I have a section titled VMWARE-SCRIPTS that has the content I downloaded in the prior post. In that heading are a few icons to create a new file or even a new folder.
- Let’s create a new sample file by clicking the page icon with the green plus over it. Then, give the file some kind of name. In this example, I’ll create a new file called sample-file.txt.

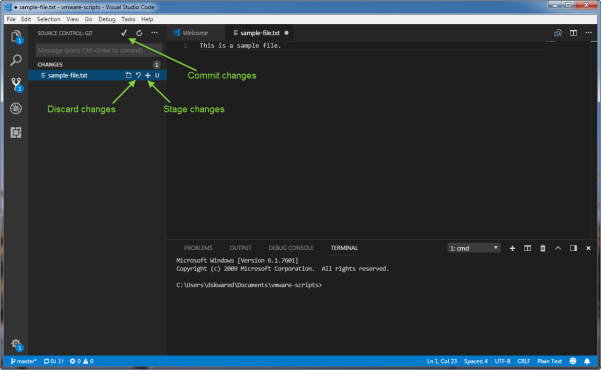
- Now in VS Code, the file name appears in green text, and a new bubble icon has appeared over the Source Control icon. If we click on that Source Control icon, we can see that there’s now a change pending for that file. I believe the U at the tail end of the file name means that the file is new and not tracked by GitHub yet.

- At this point, you can discard those changes, stage the changes, or commit the changes directly to the online repository (skipping the whole staging process completely). It’s up to you.
- I was confused about staging files in the beginning, but the way I understand it is this: Let’s say you’re working on a script that has two features. The one feature is now working, but the second feature still needs some additional work. Once you get the first feature working, you can stage the changes to help track progress. And you can continue working on the second feature after you’ve staged the progress made on the first feature. If a commit were to be performed while the second feature is still being developed, only the staged changes would be committed to the online repository. At least, that’s the way I understand it…
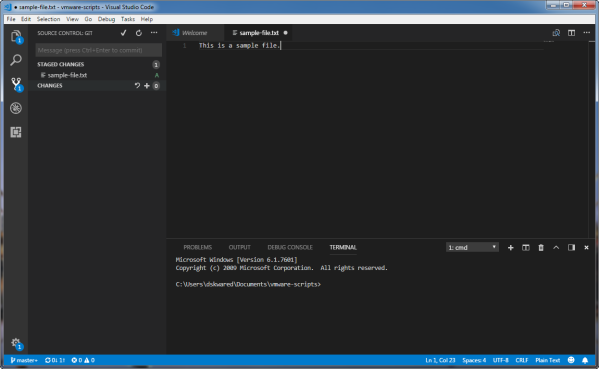
- At any rate, in this screen shot, I clicked the Stage Changes icon (the plus (+) sign), and now we can see that an index of changes have been added.
- When you’re ready to commit the changes, click the checkmark icon [ √ ] near the heading Source Control: Git. Once clicked, you’ll be asked to enter a commit message into the Command Palette near the top of the VS Code window. Type in a descriptive message and press Enter.

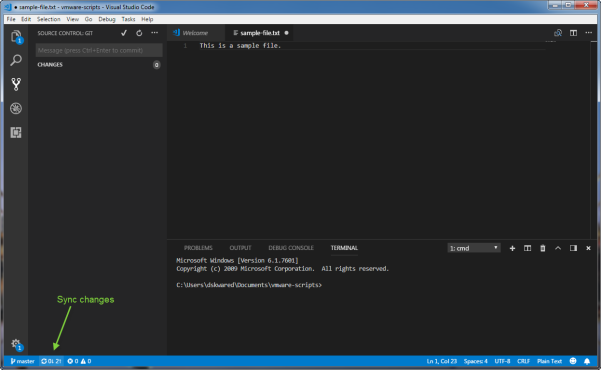
- Now that changes have been committed to your local copy of the repository, it’s now time to synchronize those local changes with GitHub. In the lower left corner of the screen should be a set of sync arrows, followed by a number of items that need to be downloaded/uploaded with the remote repo. Click on this set of arrows to kick off the sync process.
- After clicking the sync arrows, the following Visual Studio Code dialog should appear. Click OK or OK, Don’t Show Again to acknowledge the message and begin the sync.

- Again, assuming this is your first time running the synchronization task, you will be asked to login with your GitHub credentials and 2FA password (if you have that configured on your account). Enter your credentials and click Ok.


- At this time, the sync should be started, and after a few moments, hop over to a web browser, login to your GitHub online repository and you should now see your new files and changes! (In this example, we can see that sample-file.txt was recently added).

One More Thing…
In true Steve Jobs’ fashion, I decided to add one thing to this post and that’s how to update VS Code. Updating is very simple, actually. If you’ve noticed the screenshots earlier in this post, the little gear icon in the lower left had a blue bubble over it. That means there’s an update available. The steps to update are pretty straightforward, but I still thought I’d show the process here.
- In the lower left corner is a gear icon (in this case, it has a blue bubble over it). Click on that gear icon.

- In the sub-menu that appears, click Restart to update… and VS Code will exit and begin the updating process.

- The update will be installed on your system.

- Once updates have finished installing, VS Code will relaunch with an updated release notes file. Voila! You’re all caught up!

Conclusion
I hope you’ve found the past several posts useful in how to synchronize your scripts or other content between Visual Studio Code and GitHub. Back when I was trying to get this set up, it wasn’t really clear (at least to me) what steps needed to be taken, and in what order, to get the various pieces working. In the end, I learned something new and decided to put this blog series together in an attempt to help others out there in the tech community. As always, thanks for reading!

I did it 🙂
Cool review! Thanks!
LikeLike
Awesome! Glad to know it helped!
LikeLike